
Cold Process Soap Making Tutorial A Lesson in Lye Soap Making
Want to know how to use the cold process soap making method to create soap completely from scratch? Are you ready to start practicing in the "real deal" in lye soap making?
Well, you've come to the right place! On this page (and throughout this site) I'm going to explain cold process soap making so that you can create beautiful, handmade soaps right in your kitchen.
Before we get started, I would like to explain the two main aspects of cold process soap making that make it my favorite style:
- You are always in complete control of what goes into your soap because you create it from scratch.
- It's an absolute blast! The cold process soap making method neatly mixes science with art to form a unique crafting experience.
Ready to make your own? Good! Now let's get started...
So, what are your first steps?
The very first thing you must do is understand what soap is. This is absolutely vital in learning cold process soap making.
Now choose a soap making recipe. You can use your own, or pick out a project from my ever growing library of soap recipes.
Next, make sure that you review these soap safety guidelines.
Finally, gather all your supplies and ingredients...
Soap Making Resource's quality products: |
|||
 |
 |
 |
 |
 |
 |
 |
 |
Free delivery on orders $200 or more *Contiguous USA only |
|||
Sign up for the Soap Making Resource e-Newsletter. |
|||
Orders Outside the USA Please Click Here. We Ship Worldwide! |
|||
Need supplies and ingredients? Soap making resource now offers a large variety of soap making ingredients and supplies.
The Process of Cold Process Soap Making
Now that you have all your ingredients and equipment prepared, you are ready to begin the actual lye soap making procedure.
At this point, make sure that you are wearing your rubber gloves and goggles. Don't take them off until you are completely done with all the cold process soap making steps!
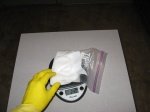
Step 1: First, you need to prepare the lye solution by mixing the carefully weighed dry lye according to the recipe with the appropriate amount of water.
Make sure that you never use hard water for cold process soap making because the unwanted substances within the water could take part in the reaction. You can get your water tested for hardness at your local appliance store.
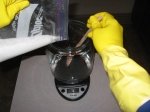
Mix the lye and water combination continuously until all the lye is dissolved. Do not break in mixing. Keep in mind that the reaction alone will cause the solution to heat to more then 200 degrees Fahrenheit; so be careful and only use a container that can easily withstand that type of heat!
How much water do you use? Well, most soap recipes will tell you, but as a general rule, use an approximate 1/3 lye to water ration - 3 ounces of water for every 1 ounce of lye.
|
Sign Up Today!
*Your information is SAFE with us! |
Understand that the H2O molecules do not actually take part in the cold process soap making reaction, but merely serve as a solvent. If only dry sodium hydroxide is used, it won't all be able to interact with all the oils or fats in the recipe. The addition of water ensures the equal spread of the sodium hydroxide throughout each and every ingredient.
Although the amount of water doesn't need to be exact for successful lye soap making, too much water can cause the soap to become soft while too little water can cause the soap to become caustic and dry.
Keep in mind that The measuring of oils and fats (and all other ingredients) must always be done by weight, never by volume. This is because the measurements need to be exact for the best soap making results.
With too little fats or oils, the soap will be caustic as there is leftover lye that couldn't take part in the reaction.
With too much fats or oils, the soap will become extremely soft as there will be extra unadulterated acids that could not react with any lye.
You can also add a natural preservative (antioxidant) like rosemary oleoresin extract to the fats and oils mixture before moving forward.
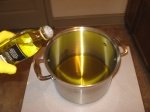
At this point, you should have one container with a lye and water mixture (the base), and one container with the oils, fats and optional preservative (your acid).
Step 3. Now wait till both mixtures drop to the recommended temperature. Most soap recipes will indicate what temperature to mix the lye with the fats and oils, but remember that this part of the cold process soap making method is mostly subjective.
As for me, I like to mix my solutions at around 95 degrees Fahrenheit for castile soap or any other all vegetable oil soap. Although I don't personally make soap with animal fats like tallow and lard, I hear that it is recommended that you combine your ingredients at a higher temperature somewhere around 110 degrees Fahrenheit for these ingredients. Experiment, once you are more experienced, but for the time being just follow whichever recipe you may be using.
If you are extremely lucky, the two mixtures will hit the desired temperature at the same time, but more then likely you will have to adjust the temperatures to get them just right.
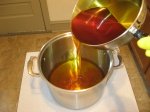
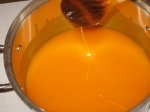
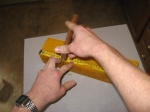
Step 4. After the desired temperatures are met, slowly pour the lye into the oils and fats mixture while stirring vigorously. Notice that I transfered my lye solution into a Pyrex measuring cup to make it easier to slowly pour the chemical into the oils. I did this after the lye cooled down substantially as not to risk breaking the glass with the hot lye/water solution.
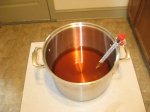
This is the most important step in the cold process soap making procedure. You must stir the solution constantly and rather briskly in order for all the necessary molecules to interact. I find it best to stir the liquid in a figure eight pattern. For even faster results, you can use a powered stick blender.
If the soap stays on top of the solution for a brief period before sinking back into the rest of the solution, saponification has taken place, and the soap is ready. This stage is commonly called trace.
Keep on mixing until you reach trace... this should take 45 minutes to 1 hour for most cold process soap making recipes if stirred manually, but keep in mind that the time it takes for the formula to saponify may vary drastically. If a stick blender is used, trace can sometimes occur in as little as 2 minutes!
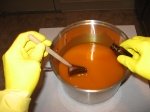
Mix the concoction until everything looks even toned.
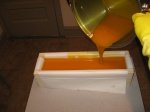
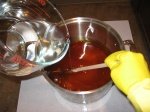
Now leave the soap for about 18 - 36 hours depending on the ingredients used. Once again, the recipe should suggest how long to let the soap initially cure before cutting.
If you used individual molds, remove the already formed soap bars.
During this time, the soaps PH level will remarkably drop and your finished product will be wonderful mild and natural homemade soap.
Before you use your soap, be sure to scrape off any white powder (soda ash) that formed on the top of the bars. This substance can be drying to the skin.
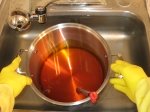
Clean Up Time...
Remember to label every single tool as "use for soap making only" so that it's not mixed in with your cooking supplies. Even if you feel that your supplies are cleaned thoroughly, I wouldn't risk cooking with it!
Make sure to wash everything by hand. Don't use the dishwasher, because the leftover soapy residue can cause it to leak! This will also help avoid contaminating other kitchen utensils with the harmful lye.
Finally, be sure to store all extra supplies (especially lye) in a safe area away from children and pets.
Congratulations! You now know how to make soap at home using the cold process soap making method. Pick from one of my many soap recipes and give it a try! I hope that as you continue to learn about soap making, you will be able to use this website as your own personal resource.
Oh, and Don't forget, you can contact me anytime with your questions. I'm more then happy to help!
Return from cold process soap making - a lesson in lye soap making to how to make soap


SMR News
Spring 2015: The new SMR website design has officially been launched and we’ve added lots of new features!New: Gift Certificates
Beginner? Try one of our soap making kits today!
Then why not use the button below, to add us to your favorite bookmarking service?


