
Unique Soap Molds - Where to Buy them and How to Make Soap Molds that Stand Out
Using unique soap molds can make soap making even more fun then it already is and going against the grain can also help distinguish your soaps from everyone else's.
Some soap makers actually prefer the simplistic and predictable look of the classic soap bar, but molds for soap making don't necessarily have to be basic.
Are you the artsy and creative type? You may just like experimenting with different ways to shape your soap. This page gives you an overview of a few different types of unique soap molds and will hopefully spark some of your own original ideas.
|
Sign Up Today!
*Your information is SAFE with us! |
Do you want to know how to make soap molds that stand out from the crowd? Just follow my guidelines, and try to think outside the box!
PVC Soap Molds - How to Make Soap Molds that are Both Fun and Cheap
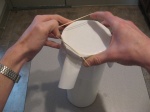
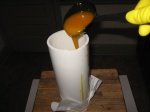
In the past, I have used simple PVC pipe to create wonderfully shaped soaps. The circular form of the final product is very different and refreshing from the normal rectangular bar.
Learning how to make soap molds out of PVC is extremely easy and only require 5 inexpensive pieces:
- The PVC pipe
- Wooden cutting board
- Funnel
- ladle
- plastic wrap
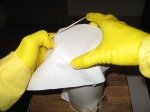
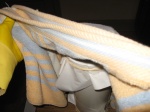
After about 24 - 48 hours, the soap will be hard enough to remove from this unique soap mold. Unwrap the towels, take off the plastic wrap and slide the soap out of the PVC pipe. Make sure you are wearing your rubber gloves because at this point the soap could be still a bit caustic.
Removing the soap can sometimes be a little tricky. If you are having a hard time, try to push the soap through using a bottle or jar. Alternatively, you can cool the soap in a refrigerator for about an hour which will cause it to contract just enough to slip out easily. One trick that some soap makers use is to line the pvc soap mold with petroleum Jelly before pouring in the soap. This makes it much easier to remove your product later on.
Once you have removed the soap from its mold, use a soap cutter to slice it into even pieces. Place each soap piece on a rack so that air can circulate around it as it further cures for about 4-8 weeks depending on the recipe.
After your ph level test checks out, you are ready to use or sell your new homemade soap. This type of molding method is also a great way for soap makers on a budget who can't afford anything fancy to shape their soaps.
Clam Shell Soap Mold
You can also create unique soap molds using real clam shells. Just like making PVC soap molds, The process is extremely simple:
- Create your soap as usual, using either the cold process method or melt and pour technique.
- Take a few seashells from your collection (if you have one) or buy them from a craft store and thoroughly scrub it with an antibacterial agent and rinse with water.
- Pour the liquefied soap into each shell being careful not to spill.
- Wrap each soap filled clam shell soap mold with plastic wrap.
- Line the shells in the bottom of a shallow box.
- Cover the box with plastic wrap.
- wrap the box with about 6-8 towels.
- After 24 - 48 hours, when the soap is solid but not fully cured, remove the soap from the molds.
- Place each seashell shaped soap on a rack to further cure for about 4 - 8 weeks
You can use or sell your new homemade soaps after the ph level test checks out.
Buying Unique Soap Molds
Are you looking for something original, but can't think of anything for yourself? Maybe you want a mold that will blow your socks off with its originality and creativity. As you know, some tasks are beyond what you can accomplish with merely supplies laying around the house and your own two hands.
Luckily, there are many unique soap molds that are available for the homemade soap maker to purchase. Here's just a fraction of them:
- 3D soap molds - Definitely the most fun and creative to work with.
- Animal molds
- Holiday molds
- Religious symbol molds
- Flower molds
- And many more...
Don't forget, feel free to contact me with any questions you may have!


SMR News
Spring 2015: The new SMR website design has officially been launched and we’ve added lots of new features!New: Gift Certificates
Beginner? Try one of our soap making kits today!
Then why not use the button below, to add us to your favorite bookmarking service?


