
Melt and Pour Soap Making
Creating melt and pour soaps can be an absolute blast. Anyone from children to soap making connoisseurs can have loads of fun with this craft. And I must say, the sky is the limit when it comes to creativity and complexity! I've witnessed some absolutely incredible melt and pour creations that you have to see to believe. True pieces of art!
|
Sign Up Today!
*Your information is SAFE with us! |
Today, I am going to explain the basics of melt and pour soap making so that you can enjoy making custom soaps at home using this simple method. Before you start, make sure that you have all your supplies and ingredients. Here's a list of what you will need:
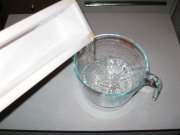
You should always melt a little bit more soap then what you actually need because some of the base could stick to the side.

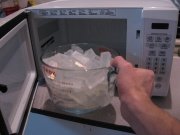
Keep in mind that how much time it takes to melt depends on the power of your microwave and the amount of base you are trying to liquefy. Just to be safe, I recommend that you start with 45 seconds to get a gauge for how much time your melt and pour base needs to spend in the microwave. It's better to be safe then sorry!
Now it's time to get out your wooden mixing spoon.
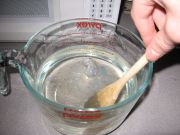
Caution: Once the soap is melted, be extremely careful! The melt and pour soap base can get exceptionally hot.

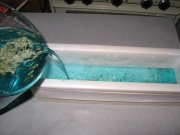
Allow the soap to completely harden before you try to remove it from the mold. You can speed up this process by placing it in the refrigerator.
Last, but not least, pop your finished product out of it's mold and enjoy your new creation!
OK... clean up time. One important tip: It is vital that you wash all equipment by hand and not in the dishwasher. The excess soap that sticks to your equipment can cause too many suds and make your dishwasher leak. Trust me, that's not fun!
Congratulations! After cleaning up you are now done creating your first simple soap making project... wasn't that great? As you continue to learn more about soap making you may find yourself returning to the melt and pour method quite often as a change from the other techniques that involve making soap from scratch.
Are you ready for something a little different? Click here to learn how to make soap from scratch using the cold process method. I think you'll love it!


SMR News
Spring 2015: The new SMR website design has officially been launched and we’ve added lots of new features!New: Gift Certificates
Beginner? Try one of our soap making kits today!
Then why not use the button below, to add us to your favorite bookmarking service?


