
Soap Making Molds
Complete Learning Resource
Soap making molds come in a somewhat overwhelming amount of styles, shapes and sizes. Your mixture has finally reached saponification and you're ready for the final step of creating the actual bars. So, What do you use to create the soap's shape and complete your work of art?
There are seemingly endless possibilities of how you can make your finished product look. That's all part of the fun! On this page, my goal is to let you know each of your options for shaping soaps into personal masterpieces and let you in on some tips for this stage in the soap making process. Click on each blue link for a more detailed explanation on that particular soap molding method.
The first method, is purchasing pre-made individual soap making molds. This is a great place to start for beginners because it avoids any type of cutting or beveling and is also great for small batches. All you do is pour the soap into the mold, let it set, and pop out a perfectly formed bar of soap.
|
Sign Up Today!
*Your information is SAFE with us! |
This method is not without its downfalls though. You should not use this type of mold when making multiple bar batches using the cold process soap making method.
With the cold process, once your soap is poured into the mold, it needs to be wrapped with towels for insulation during the first 24 hours. Using individual soap making molds makes this task rather difficult as you will have to wrap each one separately.
Alternately, you can somehow find a way to group all the smaller molds together (without spilling any of them) so that they can all be wrapped at the same time. This, unfortunately, is much harder then it sounds.
I strongly recommend that you stick to individual molds for melt and pour soap making only. You can get individual bar molds in all different types of intricate designs allowing for a great amount of creativity.
The second method, one that I personally use most often, is to use a wooden soap mold to create somewhat of an "oversized bar of soap" called a soap loaf. This loaf of soap is then cut into smaller, more typical bars using a soap cutter.
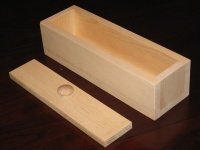
Before you cut the soap into bars, make sure that it had enough time to cure in the wooden soap mold. This should take approximately 24 - 36 hours.
The rest of the curing needs to be done after the soap is removed from the mold and placed on a rack for air to circulate around it.
The third and final method is to tap into your creativity and make your own unique soap molds. The sky is the limit with what you can do. It's a lot of fun; so try and think outside the box!
My only word of advice is to make sure that what you are using as a mold will withstand the caustic properties of lye and uncured soap. The last thing you want to happen is for your curing soap to eat through the mold, and then damage your table or counter top!
Learn about other soap making supplies.
Click here to learn how to make soap
Return from soap making molds to the soap making resource home page.


SMR News
Spring 2015: The new SMR website design has officially been launched and we’ve added lots of new features!New: Gift Certificates
Beginner? Try one of our soap making kits today!
Then why not use the button below, to add us to your favorite bookmarking service?


