Easy Soap Recipe
On this page I'm going to explain an easy soap recipe that's perfect for any beginner. Despite its simplicity this soap making recipe, happens to be one of my all time favorites! The powerful combination of natural skin care oils creates an incredible product that absolutely no store bought soap can beat.
Here's What you will Need...
As with most easy soap recipes, there are very few ingredients used. Here's what you will need:
Free Soap Making e-Newsletter
Plus instantly receive one of my own personal soap recipe formulas using a combination of sweet almond oil, avocado oil, olive oil, coconut oil, palm oil, castor oil and shea butter scented with an intoxicating essential oil blend. This recipe is explained step by step in full detail. you're going to love it!
- Instantly receive one of my own soap recipe formulas.
- $5 Coupon off your first purchase of $30 or more!
- Access to more exclusive subscriber coupons.
- Future Soap making recipe tutorial announcements.
- How to make lotions, bath bombs and more!
- Interviews with successful soap makers.
- Contests with awesome prizes.
- Revealing soap making poll results.
- New product announcements, demos and reviews.
- Unbeatable Soap Making Resource Sales!
|
Sign Up Today!
*Your information is SAFE with us!
|
Before going any further, I recommend that you get familiar with the
cold process soap making method. If you are a beginner, this is especially important! Also, make sure that you are following all
soap safety precautions. Even this relatively easy soap recipe can be dangerous if you don't follow a few simple safety guidelines.
Get the Kit! (Out of Stock)
The easy soap recipe is now available at Soap Making Resource as a soap making kit. The kit will include full written instructions and all the ingredients needed to complete the recipe except for the lye and distilled water. Distilled water, of course, can be picked up at just about any grocery store and lye can be picked up locally in most states as well. As an additional bonus, I will also provide contact information for my personal supplier source for lye within the kit. So, if you can't find lye locally, you can always order it from this supplier and have it shipped directly to your home! If you don't have a mold, be sure to pick up one of the Soap Making Resource 5lb wooden soap molds or 5lb acrylic soap molds along with your kit!
Easy Soap Recipe Kit: $32.89 Out of Stock
Let's Make Soap!
Here's the step by step process...
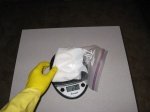
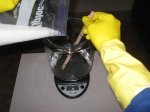
Step 1: Weigh out the 209 grams of dry lye. I usually do this by filling a re-sealable bag with the sodium hydroxide and weigh it on a digital scale.
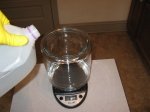
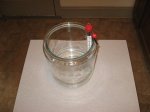
Step 2: Weigh out the 20 ounces of distilled water in a heat safe jar.
Step 3: Carefully pour the lye from the re-sealable bag into the water while stirring the solution briskly with a silicone, heavy duty rubber, or wooden utensil. Keep mixing until all the lye is dissolved. The reaction created by combining the lye with the water will cause this mixture to heat up; so be careful!
Step 4: Place a thermometer in the lye/water solution and set safely aside for future use. The temperature needs to reduce to about 95 degrees Fahrenheit before it is ready to use.
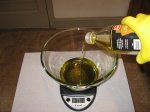
Step 5: Measure out the 26.5 ounces of olive oil, 16.5 ounces of coconut oil and 10 ounces of palm oil. for the beginner, it may be best to do this in separate glass bowls.
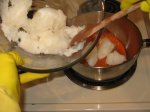
Step 6: Melt the 2 solid oils (the coconut oil and palm oil) to liquid form using a 3 quart saucepan. Always use low heat as you don't want to burn the oils.
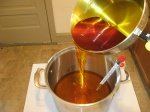
Step 7: Add the olive oil, liquefied coconut oil and liquefied palm oil to the large soap making pot and place your
soap making thermometer into the concoction.
Step 8: Now it's time to wait for the lye/water solution and the soap making oils to cool.
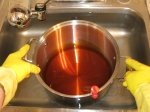
Both mixtures should be the same temperature of 95 degrees Fahrenheit before proceeding. In most cases, you will need to adjust the temperatures slightly to get them just right as it is rare for both mixtures to hit the same temperature at the same exact time on their own. If either mixture falls
below 95 degrees, you can raise the temperature by placing the entire pot in a sink filled with hot water. Alternately, if you need to cool a mixture that has too high of a temperature, you can place the pot in a sink filled with cold water. Do this until the temperatures are just right!
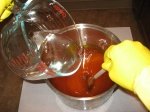
*note* Once the lye hits 95 degrees, transfer it into a Pyrex measuring cup. The spout makes it much easier to slowly pour into the soap making oils without spilling the caustic chemical all over the place.
Step 9: Now that the temperatures are equal, you are ready to make soap! Slowly add the lye/water solution to the oils mixture within the large soap making pot. Stir in a figure eight pattern continuously to ensure that the lye and oils are interacting throughout this process. For a quicker trace, you can use a stick blender.
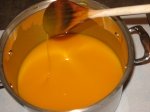
Step 10: Watch for trace. Test for it by drizzling a small amount of your mixture from your mixing utensil over the surface of the concoction. If the liquid remains on top of the surface for a brief period before sinking back into the mixture then trace has occurred. You know that
saponification has taken place and that your soap is ready when this happens.
Keep in mind that you may have to stir for up to an hour or as little as 8 minutes. Although this is an easy soap recipe, recognizing trace before it's too late is the most difficult part of any cold process soap making project, especially for the beginner. I recommend that you test for trace every 5 - 10 minutes to ensure that you don't miss it. If you stir your soap too long after trace has occurred, your soap will begin to solidify in your pot and you won't be able to pour it into the soap making mold. Keep in mind that if you are using a powered stick blender, trace will occur much faster... So modify accordingly!
Step 11 (optional): Add essential oils, nutrients and colorants if desired immediately after you notice trace. There are tons of all natural additives that can make this great easy soap recipe into something even better, but because this is supposed to be an easy soap recipe, I will leave this step out for simplicity sake. For the first time, make this soap without adding any additional ingredients. Once you get the hang of the basic process, you can add your own custom natural additives to make this recipe your very own!
Step 12 (optional): If extra nutrients are added, stir the soap briefly until an even texture and color is achieved.
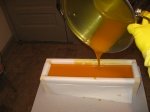
Step 13: Quickly pour the soap into your mold. This is a 5 pound soap recipe, so you should use a 5 pound mold. If there is any excess solution sticking to the side of the soap making pan,
just leave it! There's a good chance that this extra residue did not take part in the saponification reaction.
Step 14: Now it's time to insulate your soap. Place the lid, a piece of cardboard or heavy duty freezer paper on top of the mold to seal it from the air. Wrap the mold in a few blankets or several towels to help insulate it.
Step 15: Let the soap sit undisturbed for approximately 24 - 36 hours.
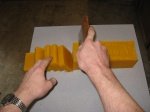
Step 16: When your new creation is firm enough to cut (should be within 24 - 36 hours depending on the recipe) remove it from the mold and slice the loaf into bars using a
soap cutter. If you own my
wooden soap mold with built in cutting slot, use the guide to cut your even bars.
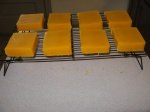
Step 17: Place each individual bar on a cookie rack to further cure. Flip them over about once a week. After 4 - 6 weeks, your soap should be fully cured and ready to use. Be sure to remove any white powder that may have formed on the surface of the soap before using or selling it. This is called soda ash, and can be drying for the skin.
Step 18: Always test the soap's PH levels before using if you are a beginner.
Congratulations! For many of you, you have created your very first all natural homemade skin care product. Because this would be classified as an easy soap recipe, it is a wonderful place to start for the beginner. Let's face it; even experts love this recipe because of the wonderful finished product that it produces!
Return from easy soap recipe to the soap recipes list.
Return to the soap making resource home page.